
TES3MP Quickstart
A step-by-step guide to setting up TES3MP from scratch with recommended mods.
Contents
Introduction
- This is intended as a very quick guide for experienced users. For a more detailed guide, see my TES3MP Guide and OpenMW Mod Management guide.
- It is heavily based on the I Heart Vanilla mod list.
- At time of writing, TES3MP uses OpenMW 0.47, so some newer features are not yet available (e.g. animation blending, built-in TrueType fonts).
TES3MP Setup
- Install Morrowind and expansions, and run the game once.
- Download and extract TES3MP.
- Run
openmw-wizard.exeand point it at your Morrowind directory.
Recommended Mods
Essential Fixes & Official Plugins
- Patch for Purists
- Unofficial Morrowind Official Plugins Patched - just the UMOPP Merged optional file
- Jammings Off - simple version (only Xnif files)
Performance
Vanilla-Friendly Graphical Upgrades
- Enhanced Textures - main file, interface and main menu, and MET 6 Atlas textures
- OpenMW Upscaled Inventory Icons
- Familiar Faces
- Big Icons
- Vanilla Style HD Icons for Attributes and Skills - 256x256 version
- Loading Screens Diversified
- TrueType fonts for OpenMW - main file, HD texture buttons and Tweaked Pelagiad font
- Pete's Journal and Scroll - the optional file with journal
Nice to Have Graphical Mods
- Cantons on the Global Map
- Chocolate UI
- Small Skyrim Crosshair
- Magic Icons (Sig Edit)
- Glow in the Dahrk
- Nords shut your windows
- OpenMW Containers Animated
- Weapon Sheathing
- Weapon Sheathing Additions
- Potions and Scroll Icons & Potion Sorter
Gameplay
Music
- The Epic Soundtrack
- Resdayn Suite (€5)
- Northern Dreams (€3)
Mod Installation
Fonts
- Place the new TrueType fonts in
%USERPROFILE%/Documents/My Games/OpenMW/Fonts. - The Tweaked Pelagiad font files should overwrite the files from the main download.
Mod Organizer 2
- Download and extract Mod Organizer 2.
- Create a new profile, with Automatic Archive Invalidation disabled.
-
Install all other downloaded mods using Mod Organiser 2.
- Installing a mod will bring up a menu with additional options.
- Some mods have multiple options but often it's just personal preference.
- Sometimes MO2 doesn't understand the structure of a mod archive, but it will give you the option to rearrange it. Normally it's just a case of dragging folders to the top level (under <data files>).
- Project Atlas: Be sure to choose "Morrowind Enhanced Textures" and enable the "Glow in the Dahrk" and "Graphic Herbalism" patches.
- Familiar Faces: Click "Manual" and drag the contents of the optional folder to the top level.
- Chocolate UI: If you want to keep the vanilla map markers, find and delete
door_icon.dds.ddsafter installing. - Potions and Scroll Icons: After installing, find
PotionsandScrollsandPotionSorter.omwaddonand rename toPotionsandScrollsandPotionSorter.esp.
The final list should look something like this:

Run External Tools
At this point, ideally you should run some external tools to clean and sort mods, and merge objects and levelled lists, as described here. However, if you are lucky then your friendly server host will provide you with the correct load order and Merged Objects plugin ;)
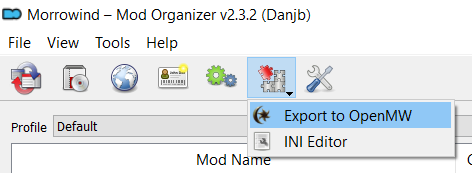
Exporting to OpenMW
- Download ModOrganizer-to-OpenMW and put
OpenMWExport.pyandopenmw.icoin your Mod Organizerpluginsdirectory. -
Export mod configuration to OpenMW via the plugin:
Final Tweaks
Recommended Settings
Add these lines to your %USERPROFILE%/Documents/My Games/OpenMW/settings.cfg file:
[Shaders]
antialias alpha test = true

[GUI]
color topic enable = true
stretch menu background = true

[General]
anisotropy = 16
texture mipmap = linear

[Game]
only appropriate ammunition bypasses resistance = true
shield sheathing = true
show melee info = true
show projectile damage = true
use additional anim sources = true
weapon sheathing = trueLauncher Options
Run openmw-launcher.exe and tweak the settings there according to your preferences.
Server Admin
- Use Tes3MpPluginHelper to populate
server/data/requiredDataFiles.json. - After CharGen, edit
server/data/player/PlayerName.jsonand changestaffRankto 2 (admin) or 3 (server owner). - Type
/runstartupin the chat window (F2). - Type
/setconsole <pid> onin the chat window to enable the console for a player (/listto see players). - Be ready to encounter a few issues during gameplay!
Play!
Connect to Server
- Edit
tes3mp-client-default.jsonin the TES3MP directory to specify the server address, port and password (if needed). - Run
tes3mp.exeto launch the game! - Press F2 to show/hide the chat, and press Y to enter chat messages.
Tweak In-Game Settings
- From the in-game video settings, enable the Water Shader (and optionally Refraction).
- You may also want to adjust the Gamma and Minimum Interior Brightness.
Enjoy multiplayer Morrowind!
Published 2026/04/23
Last updated 2026/04/24